Helios Rust Console Bot Documentation
Portals
Create a two-way teleport or a survival challenge using live location capture in the dashboard.
- Last reviewed
- Tested on
- Helios Bot Testing dashboard
- Maintained by
- Helios RCE
Use portals to connect two locations, run a survival challenge, or send players into an aim-training area. Open the dashboard, choose Manage Server → Portals, then select the portal type. Premium is required on the selected server.
| Type | Use it for |
|---|---|
| Teleport | A two-way connection between an entrance and a destination |
| DeathMatch | A challenge where a player enters a zone and survives a timer to win a prize |
| Aim Train | An entrance to a training area, with respawn points and a leave emote |
Example: an Outpost shuttle
Before capturing locations, link your Discord account with /link and join the selected game server. The capture buttons use your linked player's current position.
- Select Teleport and expand Create Portal.
- Enter a clear name, such as
Outpost Shuttle. Choose a colour and set Teleport Delay Seconds to3. - Stand at the entrance in game and choose Capture Entrance.
- Move to the destination and choose Capture Destination.
- Check both captured locations, then choose Create Portal.
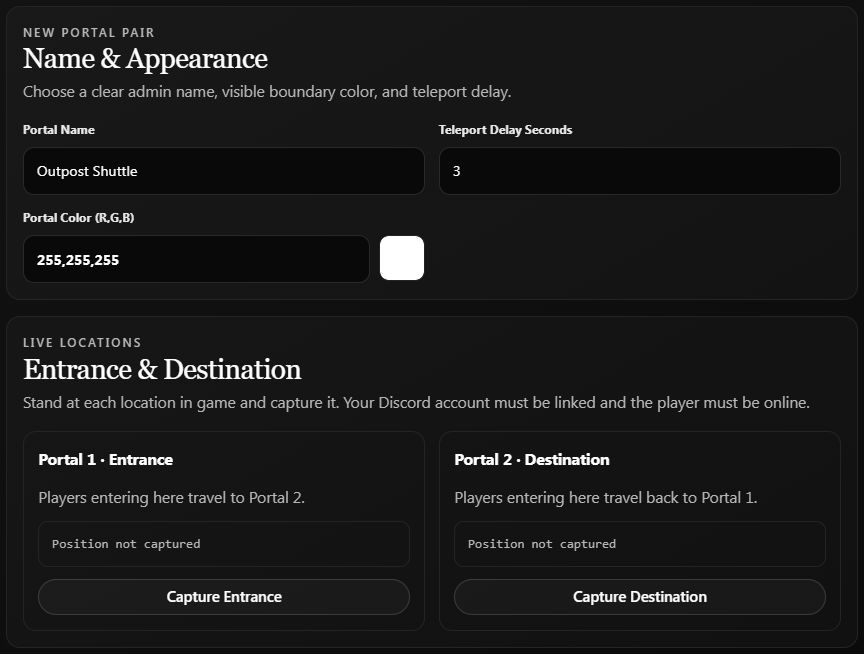
An unsaved setup example on Helios Bot Testing. The screenshot shows the form before either location is captured.
Players entering Portal 1 travel to Portal 2; entering Portal 2 takes them back. Test both directions in game before inviting players to use the route. Combat Lock can block paired portal teleports while a player is locked.
Give a kit after travel
In Give a Kit, check Give kit after teleport, enter an existing Kit Name, and set Cooldown Minutes. For example, a starter kit with a 30-minute cooldown limits repeat kit grants when players travel back and forth.
The kit cooldown controls the reward, not the teleport delay. Leave the checkbox off for a route without a kit reward. Use Kit Manager to inspect or create the kit first.
Example: survive one minute to win a kit
- Select DeathMatch, then expand Create Deathmatch Portal.
- Name the portal, choose its colour, and use Capture Portal Location while standing at the entry point.
- Set Survival Time in Minutes to
1and Max Distance From Portal (meters) to250. - Choose Kit as the prize and select an existing kit.
- Create the portal, then test the countdown in game.
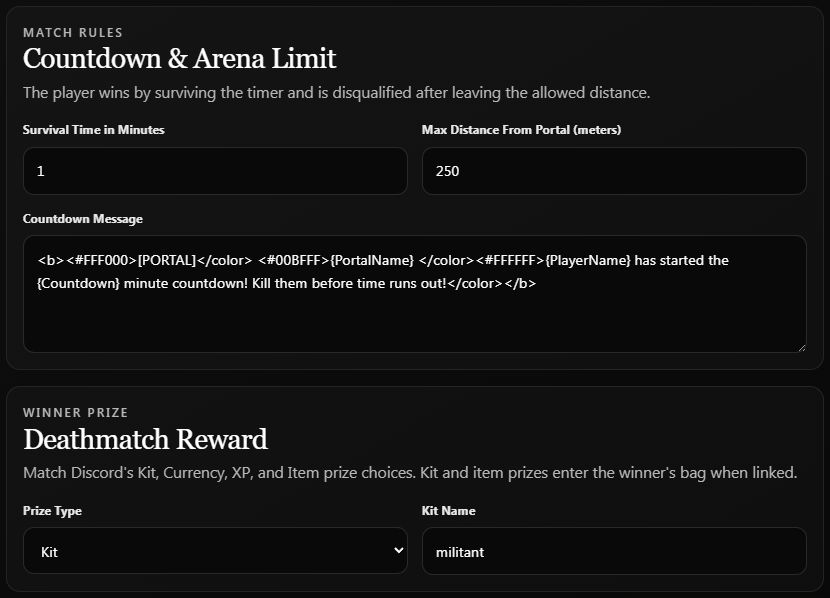
Saved rules on Helios Bot Testing. This screenshot documents the settings; no match was run for this walkthrough.
A player starts the countdown by entering the portal. They must survive and remain within the allowed distance. The announcement invites others to stop them before the timer ends.
Prizes can be Kit, Currency, XP, or Item. Linked winners receive Kit and Item prizes in /bag; Currency and XP use their linked account. If Helios shows a prize-claim prompt in game, follow that prompt.
The Countdown Message supports {PortalName}, {PlayerName}, and {Countdown}. A simple example is:
[PORTAL] {PlayerName} started {PortalName}! Stop them within {Countdown} minutes.
Aim Train basics
Select Aim Train → Create Aim Train Portal. Capture the entrance and initial destination, add up to 20 respawn points, and choose the leave emote players will use to exit the training session. Review its kit and exit settings before creating it, then test entry, respawn, and leaving with a player.
Find or pause an existing portal
Open the matching type's Existing Portals directory, search by name, and expand the portal. Review its settings before saving changes. Pause Portal lets you stop a route or challenge without deleting its setup; use the resume control when it is ready again.
If location capture fails, confirm that your Discord account is linked, your player is online on this exact server, and Helios is connected.
Discord commands
The same portal types are available to authorized staff through /portal tp, /portal deathmatch, and /portal aim-train, using the command's server selection.